
Getting Started with SvelteKit
SvelteKit, svelte’s follow up to Sapper, is now in public beta and its pretty damn good. The only problem I have ran into using SvelteKit is the limited documentation. A lot of things are similar to Sapper, but as a recent Svelte convert from React, I never actually used Sapper and had to search through a lot of Stack Overflow questions and GitHub projects to figure out how to implement some basic concepts. With the addition of SvelteKit being new, a simple Google Search on how to accomplish a task with SvelteKit is usually littered with responses about Sapper and its hard to find information relating to SvelteKit. Hopefully, others in the same situation, can find some use of the knowledge I have gained since SvelteKit’s public beta release.
Creating a Project
Creating a project using SvelteKit is very simple. Svelte will generate a template project using the following commands:
This will walk you through a setup process and ask you if you want optional support for things like eslint, prettier, and typescript. It will also ask if you want to get started with a skeleton project or a demo app. I usually select the skeleton project, but the demo app can be a good learning tool in project structure. For this article, I will assume we are working with a skeleton project.
Setting up Plugins
One of the amazing features of SvelteKit, is that it has built in support for a lot of commonly used plugins, such as typescript, sass, less, scss, babel, etc using svelte’s svelte-preprocess package. By default, the svelte.config.js file is setup to auto-preprocess any of the available plugins, so no additional setup is needed in the config.
For some plugins, an additional package is required to function properly such as installing the npm package “sass” for scss/sass support.
After you install “sass”, you can now import scss and sass files as well as use scss/sass within .svelte files when appending lang=”scss” or lang=”sass” to the style tag.
svelte-add
An easy way to get setup with some additional features is to use a npm package called svelte-add. This is a community based command line tool to add certain functionality to a SvelteKit app. They have plugins for things like GraphQL ( server side ), postcss, tailwind, etc. I personally use it to setup tailwind and it makes the process painless.
At the time of writing, there is a bug with this command ( due to a recent change in SvelteKit changing the layout filename from $layout.svelte to __layout.svelte, but it should be fixed soon, more information can be found here and it is properly fixed in the article’s github repo. )
After the plugin is setup, you can use tailwind anywhere in your project.
Project Structure
SvelteKit has a specific project structure for things like routing and static files. Let’s dive into how those function.
Basic Routing
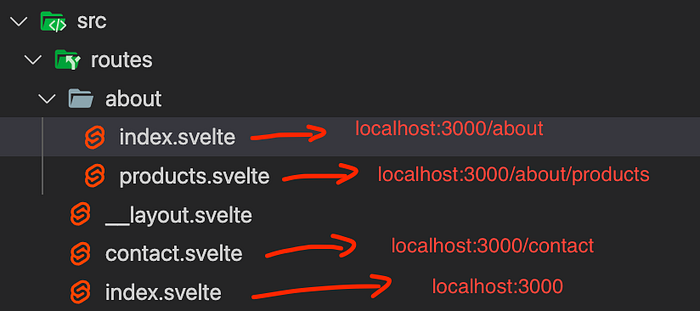
Routing in SvelteKit is similar to other SSR frameworks such as Next.js and Sapper. In your project root, there is a src/routes folder that will contain all of your routes. Routes will match up with the file name, so the file “src/routes/contact.svelte” will match the url “localhost:3000/contact”. You can also have a folder that contains nested routes. Having an index.svelte file within that folder will create a route for the folder name. This is better explained through the picture below.
Advanced Routing
SvelteKit supports advanced routing such as dynamic parameters. Let’s say you want to have a user route that includes the user id and displays content relating to that user. The route would look something like this:
localhost:3000/user/{the user id here}
This is very easy to do in SvelteKit. First, setup a folder named user and then add a file called “[userId].svelte”. If you want to use dynamic parameters, you must surround the variable name in []. The text within the [] will be the name of the variable we access later on.
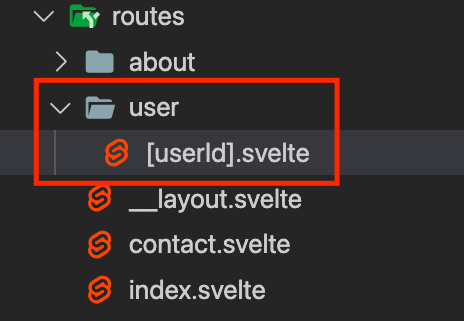
After we have created the [userId].svelte file, we can access that dynamic parameter from the page variable in the package ‘$app/stores’ ( a package included with SvelteKit ). The page variable is a store, so to access it we must prefix the variable with $ and then the dynamic parameter is under an object called params.
You can have as many dynamic parameters as you want in a route such as:
localhost:3000/user/[userId]/[receiptId]
Doing so would require you to make the [userId].svelte file into a folder instead ( src/user/[userId]/ ) with an index.svelte and a [receiptId].svelte inside.
Layouts
In many applications, there are common elements that are shared between pages, such as a nav bar or a footer. Layouts allow us to show these components across pages without un-mounting and remounting when we switch between routes.
Layouts are also good for a number of other things such as popups that might appear on any page that user visits ( such as the infamous cookie acceptance banner that appears on many websites ) or things like importing a style sheet that will be used in every page.
You can have multiple layout files and they apply to every page that is within the same directory or nested within the directory where the layout file is located. Layout files are named “__layout.svelte”. and must contain at least a <slot /> element where the selected page will be rendered.
Let’s make a nav bar and a footer that displays on every page. First create a file named “__layout.svelte” within the routes folder. Make sure you have a <slot /> element so that the page will be rendered. Below I have an example of adding a nav bar that styles the currently active link which we are retrieving from the “$app/stores” library we used before.
Now if you change between routes, the nav bar will always be there.
You can also add a __layout.svelte file to subfolders that will apply only to that sub route. If we add a __layout.svelte folder to the routes/user folder, it will add an additional layout on top of our main layout to apply to every route within the user folder.
If you wanted to do something like remove the nav bar and footer from localhost:3000/user/*, you can add a “__layout.reset.svelte” that will remove all previously applied layouts to that sub route.
Static Files
Files that you would like to include with your application, such as photos and fonts can be included within the “static” folder at the root of your project and then used with the path “/your file” within your project.
So if we include a picture under “$project/static/photo.png” we can use it like this:
Path Aliases
SvelteKit has built in support for path aliases and even includes a built in one: $lib. Path Aliases will map to whatever path you want within your project and allows you to remove a lot of the “../../../” when you need to import a file. The default $lib alias maps to “$project/src/lib”. If we have a file in here called “helpers.ts” we can import that file like such, anywhere in the project:
We can also add our own path aliases by configuring the “svelte.config.js” file like such:
We are adding a vite property to the kit object in the config and setting up an alias under it.
If you are using TypeScript, you also need to configure your tsconfig.json so that typescript will recognize the path.
Adapters
Adapters tell SvelteKit how to compile. There are a variety of adapters such as adapter-static and adapter-node. Adapter-static allows you to compile to a completely static website with no server side rendering. Adapter-node compiles a node server that provides server side rendering.
We will be adding adapter-node to our project so we can run a production server with SSR.
By default, the skeleton project does not include an adapter. To add adapter-node to our project, first lets install the package.
Make sure you include the @next at the end or else at the time of writing, it will install an old version of the adapter that will not work.
After you install the adapter, import it into your svelte.config.js file and include it under the “kit” property like so:
After you have done this, you can run the following commands to build and run the production server.
Conclusion
With all this information, you should be able to create a SvelteKit project, setup the plugins you want, create your website, and build it for production. If you would like to see more tutorials on Svelte or SvelteKit, comment your suggestions below.
You can find an example SvelteKit app using all of the above information at:
https://github.com/CameronStuartSmith/getting-started-with-sveltekit

